
Welcome to NEPTUNE
NEPTUNE is a web based proofing framework for LATEX authors. It is part of TEXFolio, the complete journal production system on the cloud.
NEPTUNE accepts author submitted LATEX documents (with or without enrichment and restructuring) as well as machine-generated LATEX documents from XML sources. Authors can edit LATEX sources as in any standard editor with extra features that would make editing a pleasure.
General
Basic instructions
Please follow the instructions in the below order:
- To start, click [Proceed] to go to the proof page.
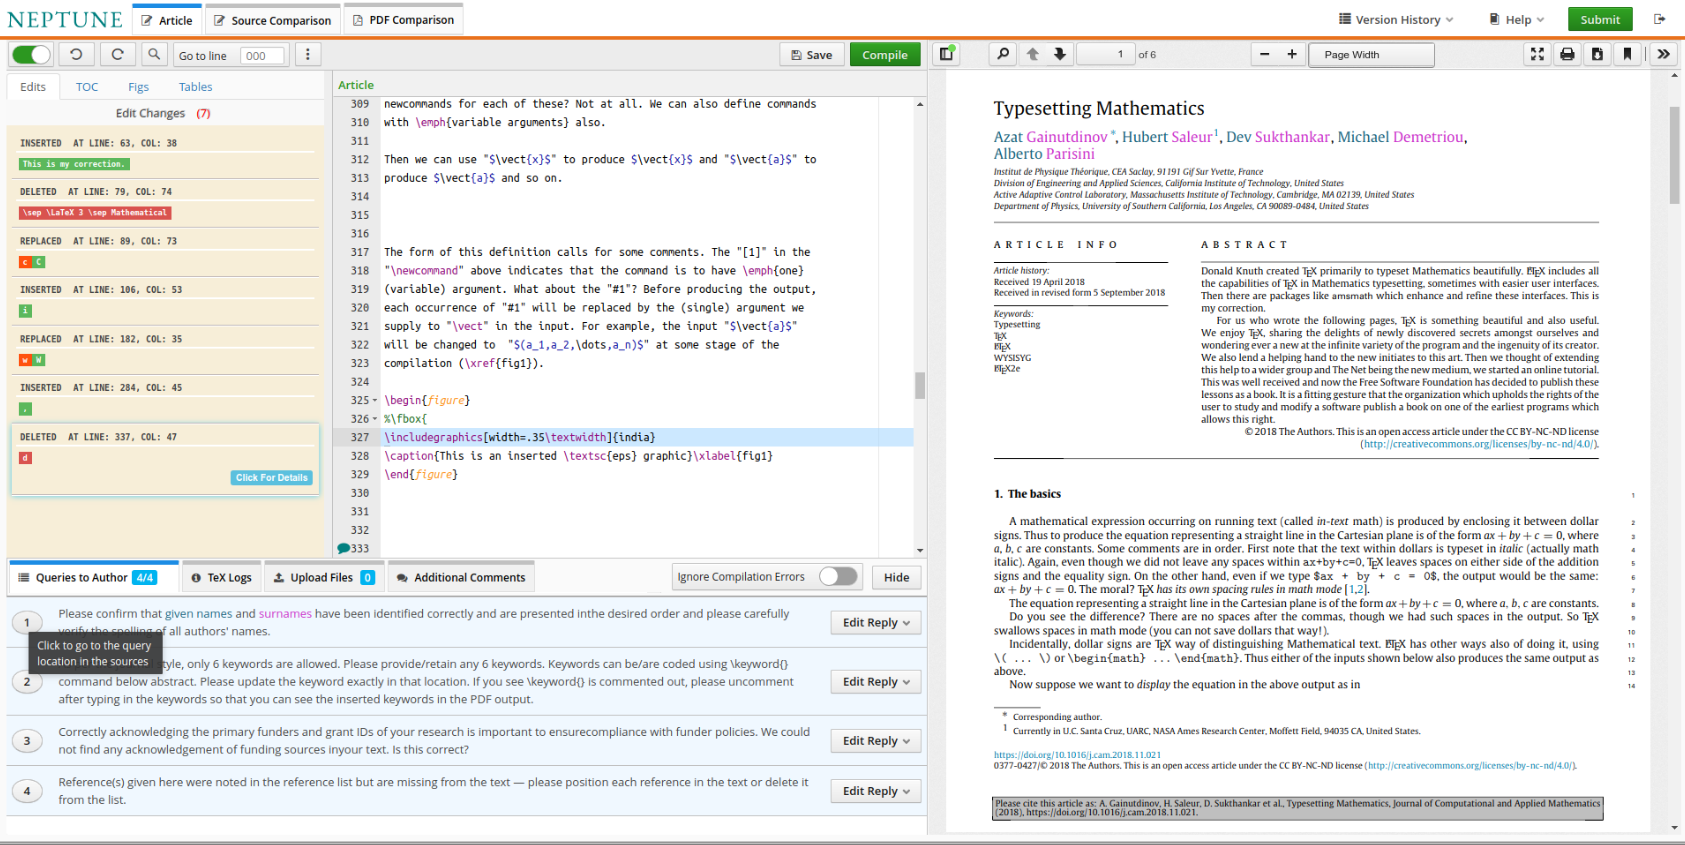
- In the proof page, a Tracker window listing all the Edits made by the Copy-Editor will be displayed. Click on each Edit to get a [Click For Details] button. Accept/Reject options (as a tool-tip) will be available under this view. In case you do not agree with a change, press [Reject the change] button. This will revert the change to the author’s version. Additionally, if you need to hide the tracker window, you may do so by disabling the [Tracking Changes] button available at the top panel.
- Click [Compile] to compile your TEX file once to sync the TEX and PDF.
- The queries added by the Typesetter/Copy-Editor is listed under the [Queries to Author] tab in the bottom panel. You need to go through each of the queries and add your comments/responses in the [Reply] field.
- Your document will be saved everytime you press [Save] button or as and when you compile the document.
- In case of any comments, use [F7] or click on the specific line number to insert inline comments within the TEX source itself. If there are generic comments, please use [Additional Comments] tab.
- Changes made by you in the document can be seen in the tracker available under [Source Comparison] tab. It is always recommended that you go through it once before submitting the corrections. Use [Upload] tab to upload any additional documents.
- After all the corrections are made, click [Submit] for final submission. Before submitting the changed document, make sure all queries under [Queries to Author] tab are responded to.
- Note that once your corrections have been submitted, your article is finalized and any further correction is no longer possible.
- Another important point to be noted is that the author should restrict from
editing certain fields in the document. These include:
     \documentclass[fleqn,s1,tex,nogcns]{neptune}
     \usepackage[5.5]{neptune-els-dtd}
     \stmchangemodel{stmjnl}{5GeSdc}
     \bookindate{2018-12-01}
     \proofdate{2018-12-01}
     \usepackage[cas]{neptune-els}
Also, care should be taken to ensure that the query commands in the document are not deleted even if the particular queries have been responded to. Such commands will be in the format, for example:
     \QUERY[1][a]{}
     \QUERY[4][no={71}]{}
Features
Add/remove objects
New objects like \section{...}, {equation}, {figure}, {table}, cross-references,
paragraphs etc., can be added or removed, which will be shown in the tracker for
later checking and to inform master-copiers. If the objects change any counters, it
will immediately be reflected in the document by automatically re-numbering the
objects . Fixing the cross-references will be completed upon compilation of the
document twice. In case the modifications have resulted in a change in the
pagination, the document has to be compiled thrice for proper updation of the
PDF.
Synchronized pre/post-edited sources
Pre- and post-edited document sources along with a tracker window displaying the hyperlinked list of edit changes are available. Authors can make a last minute verification and confirm or discard the edits at will.
No need for another proof
Since authors edit directly on the LATEX sources and view the final output as in print/web, there is no need to request for a revised proof or to wait for it, which reduces the production time considerably. They can download their edited output in PDF format if needed.
Source–PDF navigation
One-to-one link between source TEX file to PDF and back are available which makes it easier to navigate from source to the corresponding location in PDF and vice-versa. The user needs to compile the sources once for this feature to take effect.
Validated editing
Although authors can edit their source at will, the author’s TEX code will be validated immediately during the mastercopy process. Hence, chances for making errors by authors are almost non-existent.
Functional tracker
A convenient tracker of copy-editor made changes with the choice to Reject/Accept the changes is available. Default is Accept.
Error-stop/non-stop modes
PDF generation can optionally be stopped at an error or can be continued till the end of the job without stopping at errors to facilitate authors’ preferred style of debugging.
Notes, requests, comments, etc.
Any number of notes, requests, comments, etc., can be added to the document source by clicking on the line number.
Pretty-printed sources
The editor in NEPTUNE renders document source in a well-structured, pretty-printed and human-readable format which will prompt even the non-LATEX authors to try editing in the source.
Other features
- PDF output has active hyperlinks and bookmarks.
- Any number of Undo/Redo will be supported.
- Facilities available to add comments, instructions, etc.,to queries directed at authors.
- Search/replace and regular expressions are supported.
- Option to view the PDF in a new window or tab. This can be done by right-clicking on the Current View button at the top right corner of the PDF viewer and choosing the required option.
Menu
The editor menu

The following explanation corresponds to each tab or item or button from left to right and on a row by row basis.
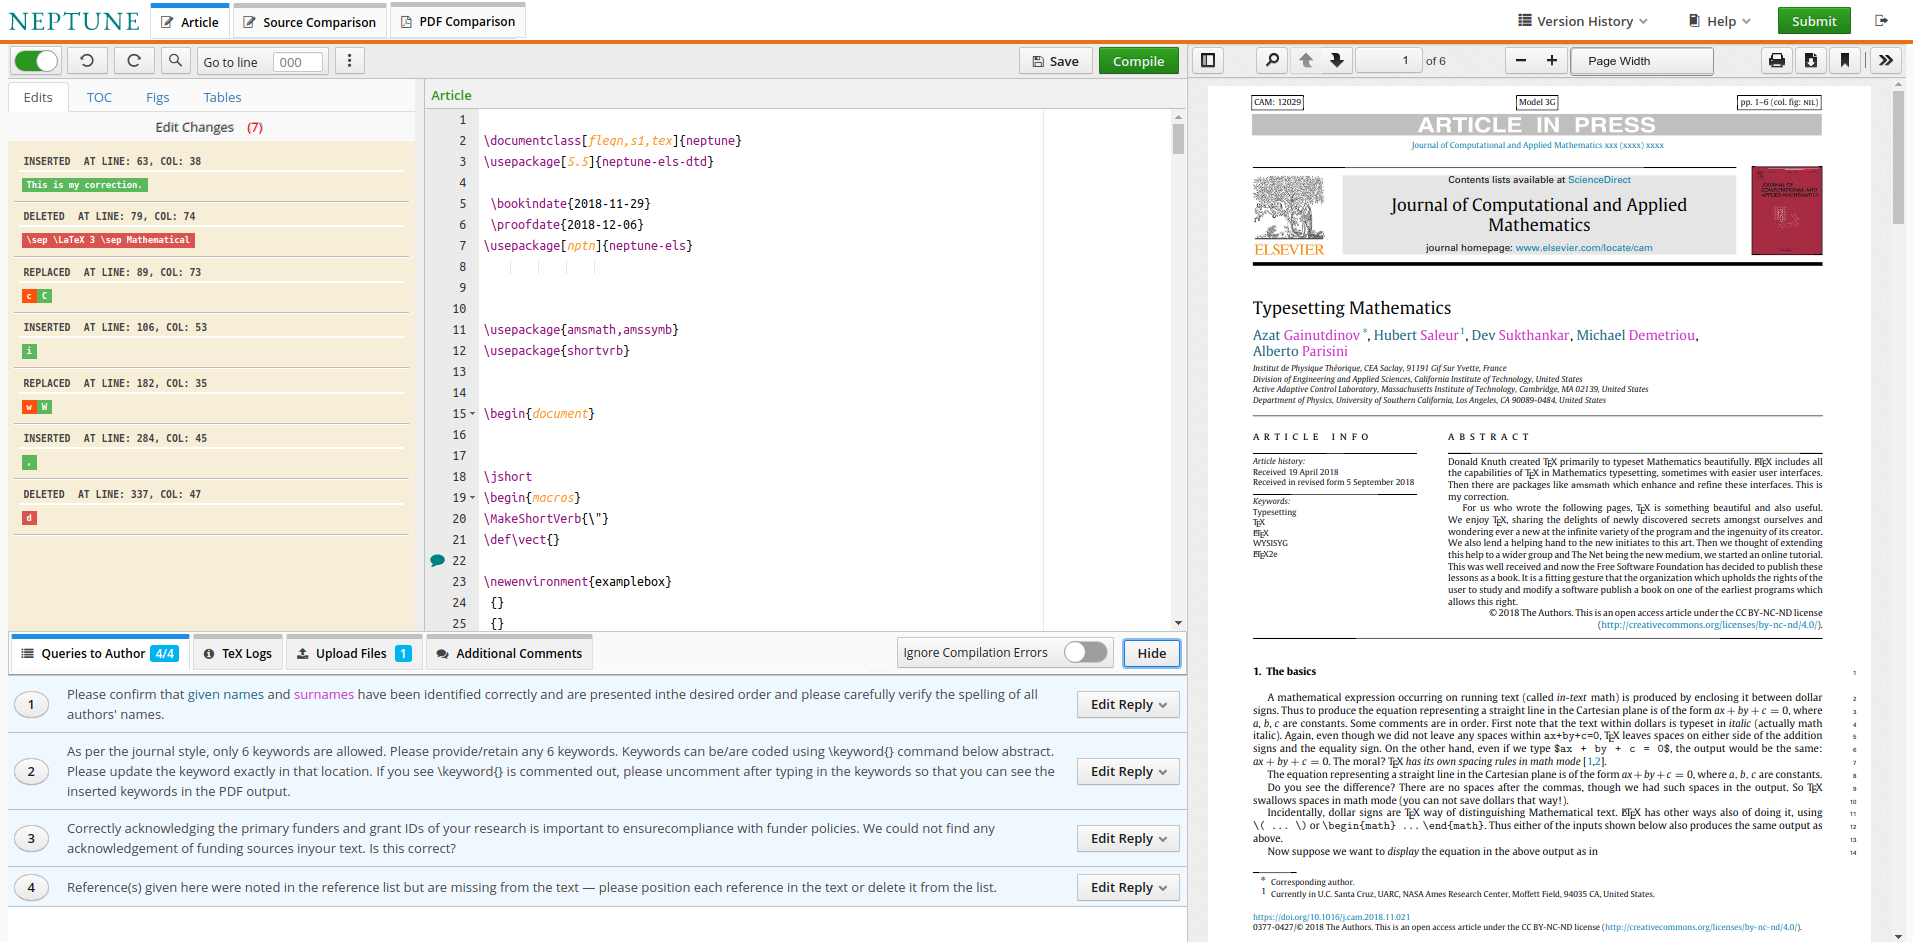
- Article: Clicking this tab will load the copy-edited author source on the left side and the corresponding PDF on the right side. This is the default state when a user lands at NEPTUNE (Screenshot).
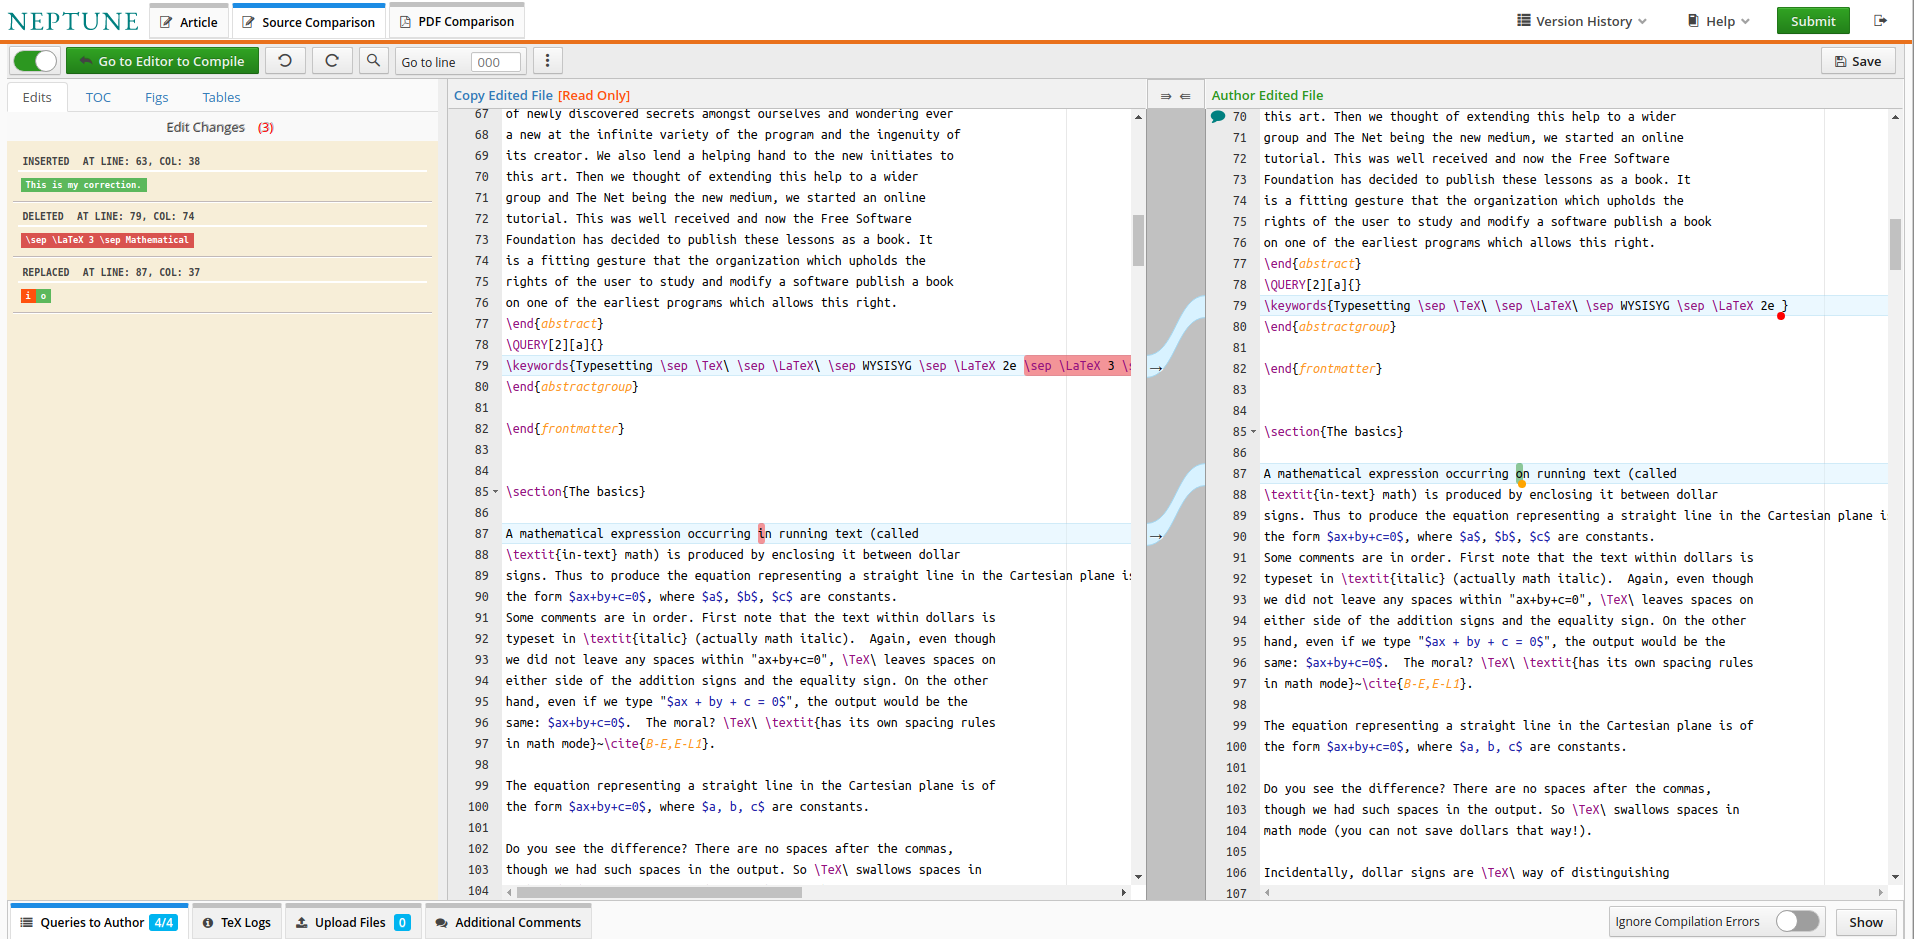
- Source Comparison: Click this tab (middle) to load pre-author-edited version, post-author-edited version (right) and a tracker window (left) listing only author made changes which are hyperlinked to the edited source document (Screenshot).
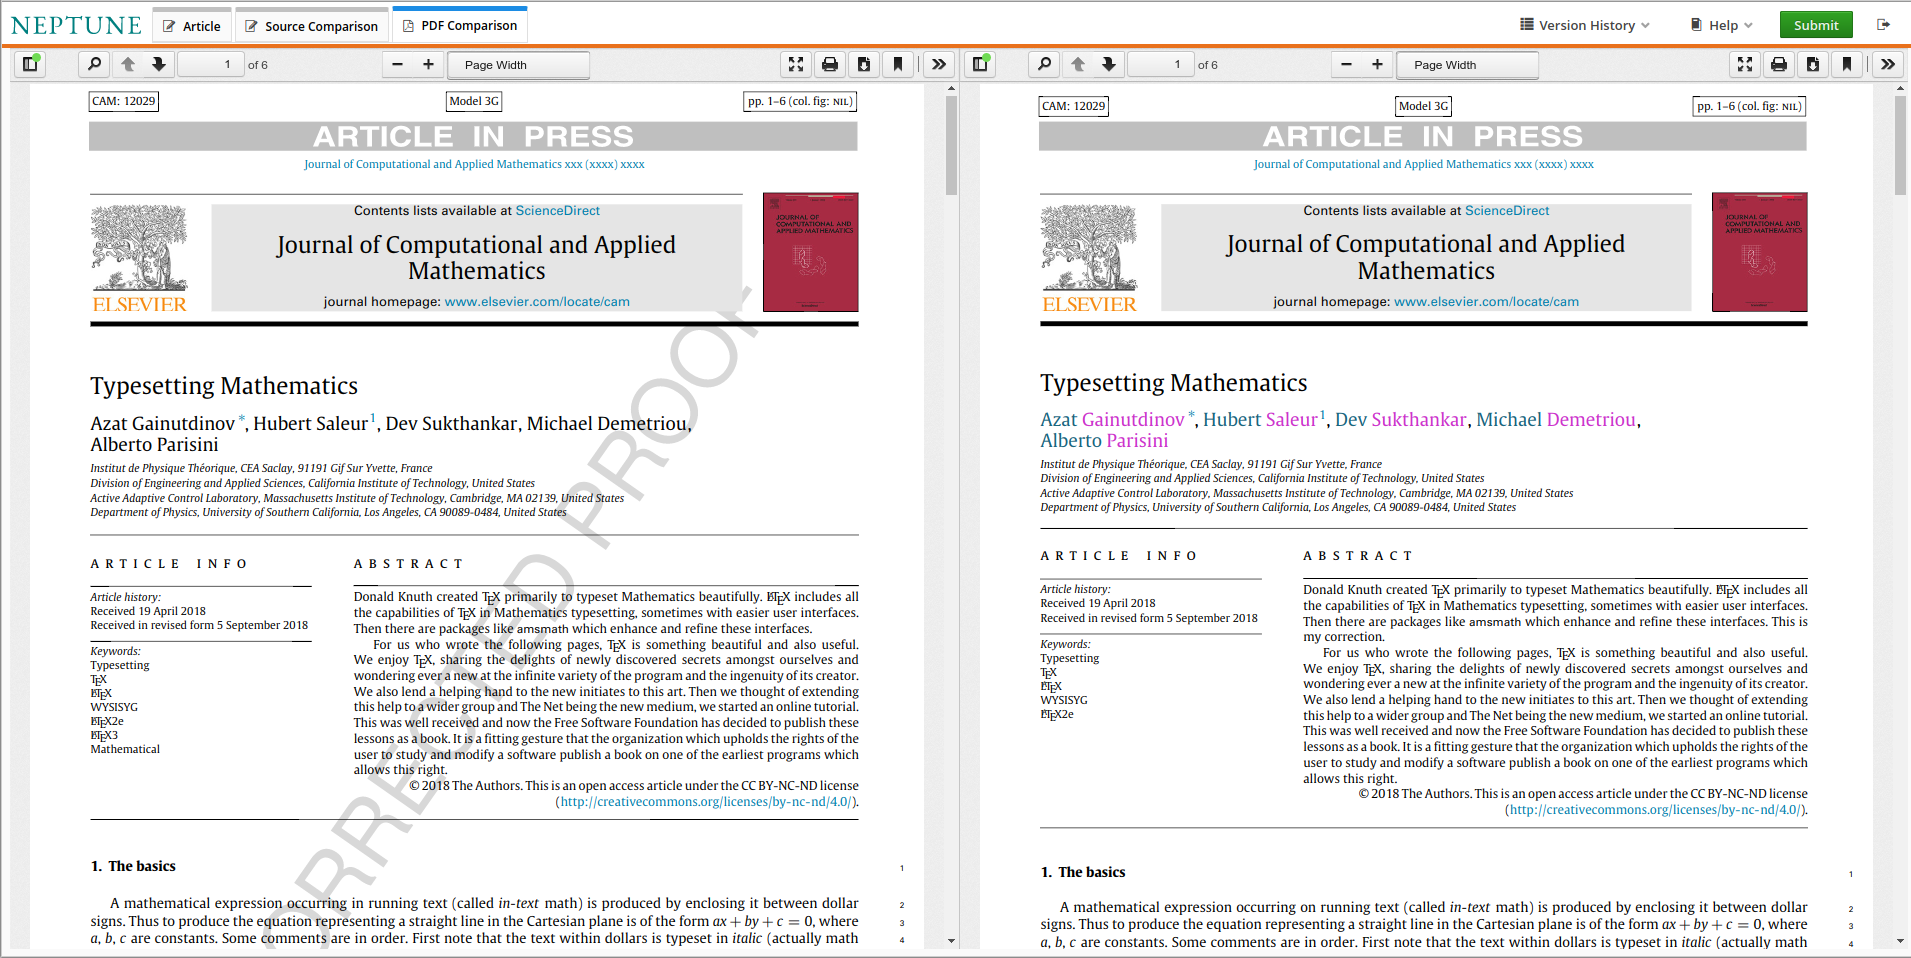
- PDF Comparison: Click this tab to load the PDF generated from copy-edited sources on the left and the PDF generated from author edited sources on the right. This would provide the authors a chance to compare the changes made by them (Screenshot).
- Track Changes: This button (ON by default) when turned off, will hide the tracker window.
- Undo: Undo a change.
- Redo: Redo a change.
- Find & Replace: Find/Replace a string.
- Go to line: By providing the line number in the adjacent box and clicking this button, you will be taken to the corresponding line number in the text editor.
- Save: As the name indicates, click to save the edited document. Changes will be auto-saved on compilation.
- Compile: Click to compile the edited document to generate PDF.
Output viewer menu

- Version History: Clicking on this item provides the author the option to save the active file to a version control system and reload it at will.
- Help: By clicking on this item, the author can choose between a help document or a video tutorial explaining all menu items and elaborating on the features and editing procedures of NEPTUNE.
- Submit: Submit the edited document once all the edits are done. All the queries should be resolved before submitting. If not, NEPTUNE will not allow this task. Upon submission, no further changes will be allowed on the document.
- Sign Out: Leave NEPTUNE.
- Buttons (white row): The buttons are standard and are explained in sequential order from left to right: bookmarks; search string in PDF; previous page; next page; go to page; zoom out; zoom in; view menu; fullscreen; print; download; current view; tools menu. All buttons have tooltip explaining functionality.
Navigation
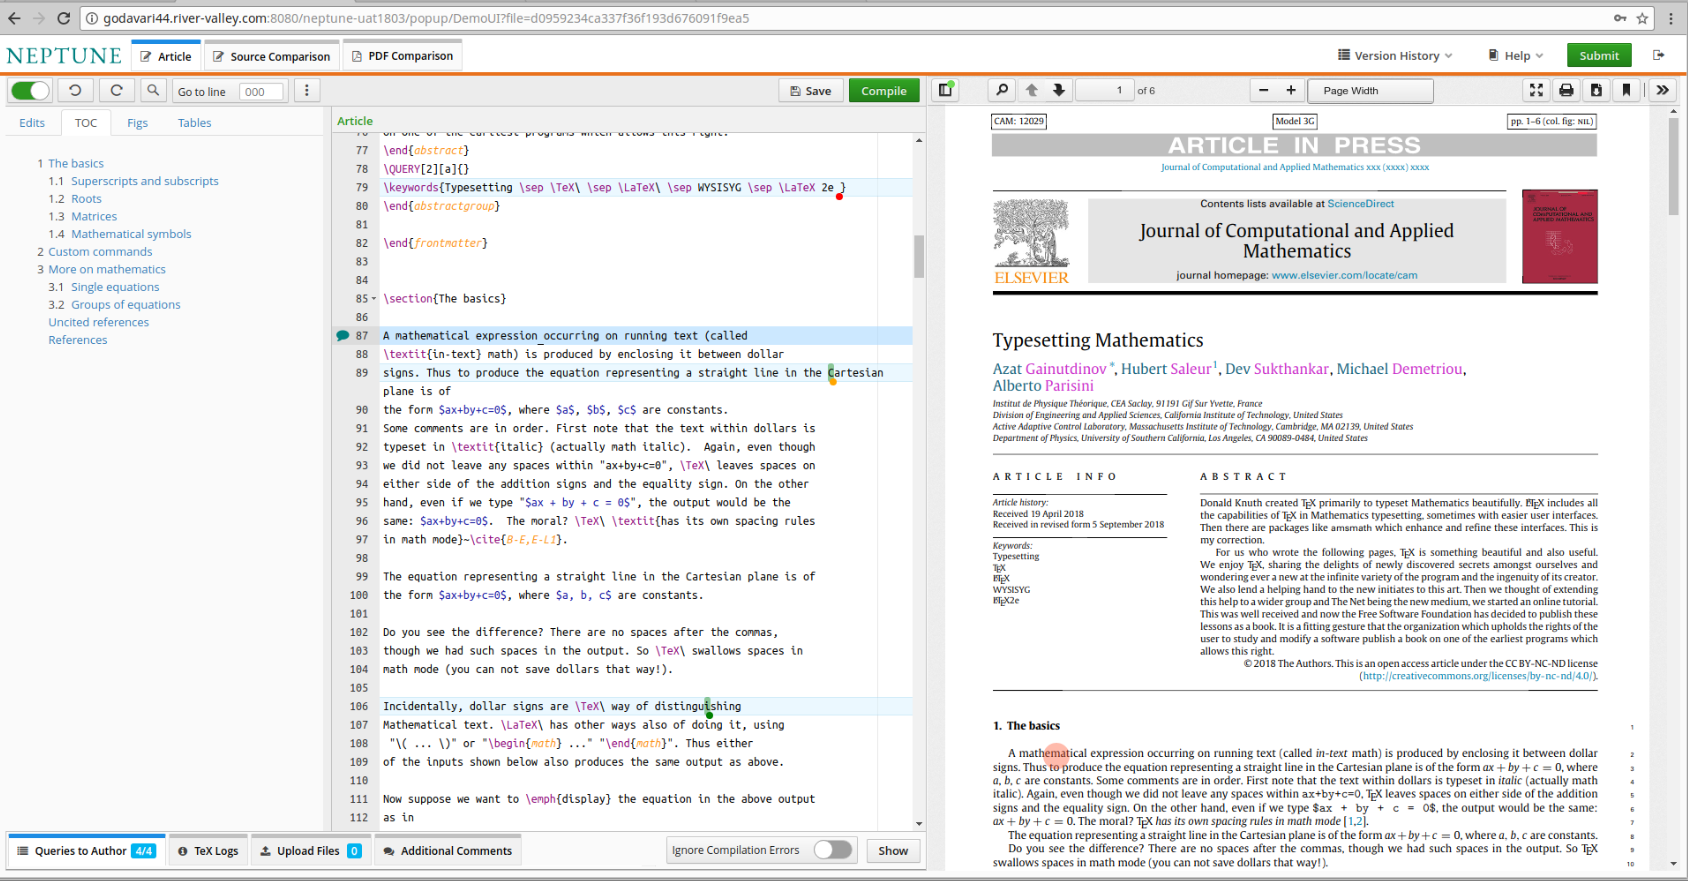
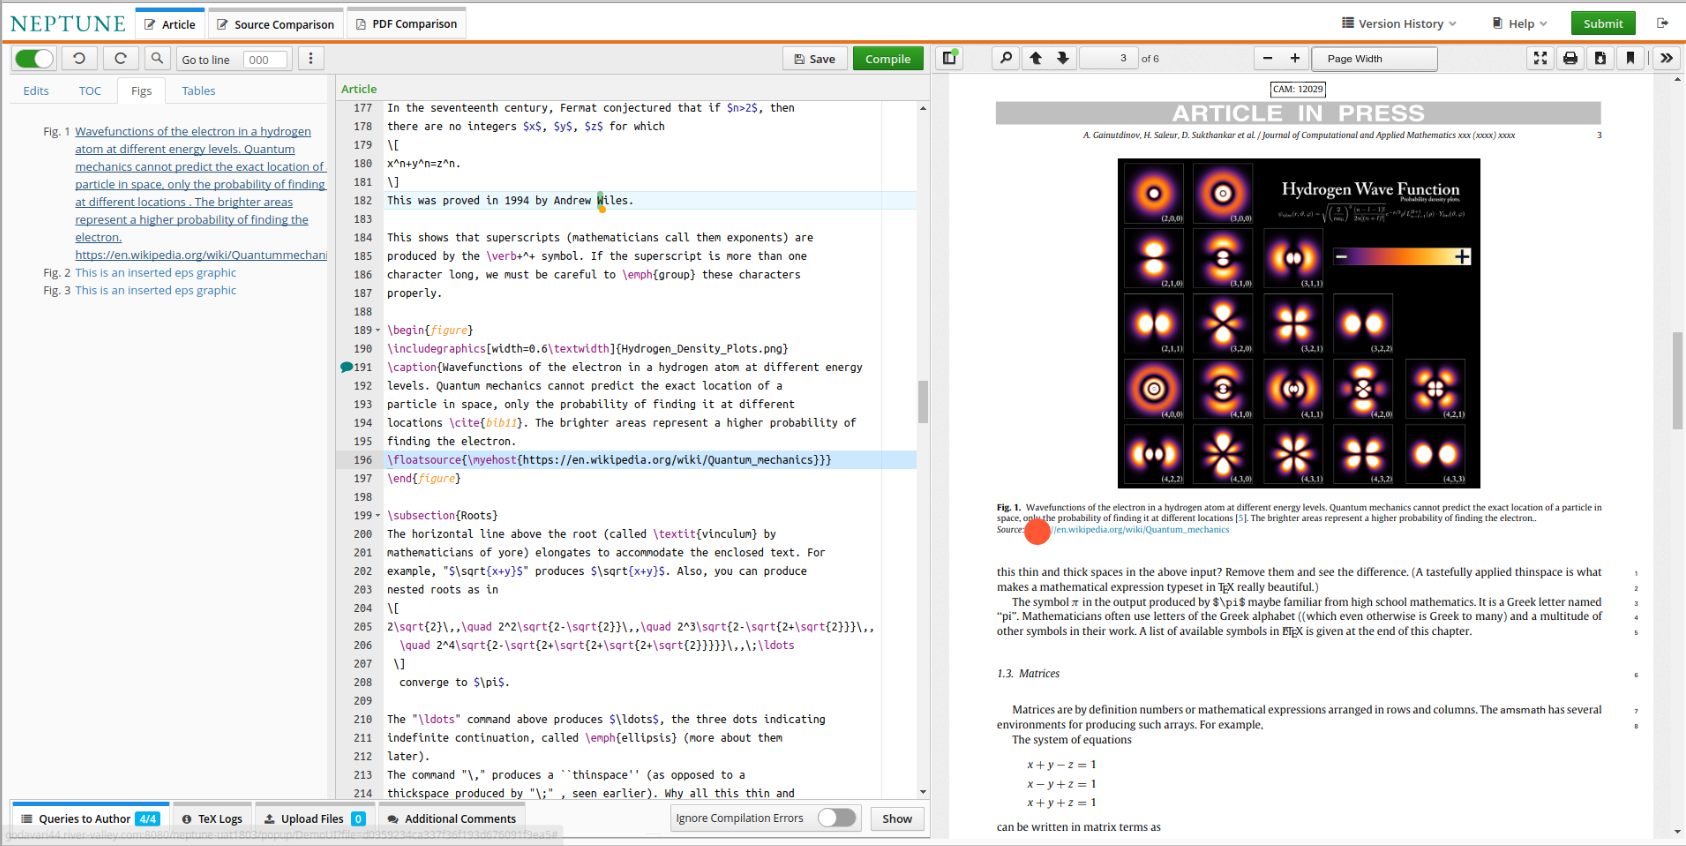
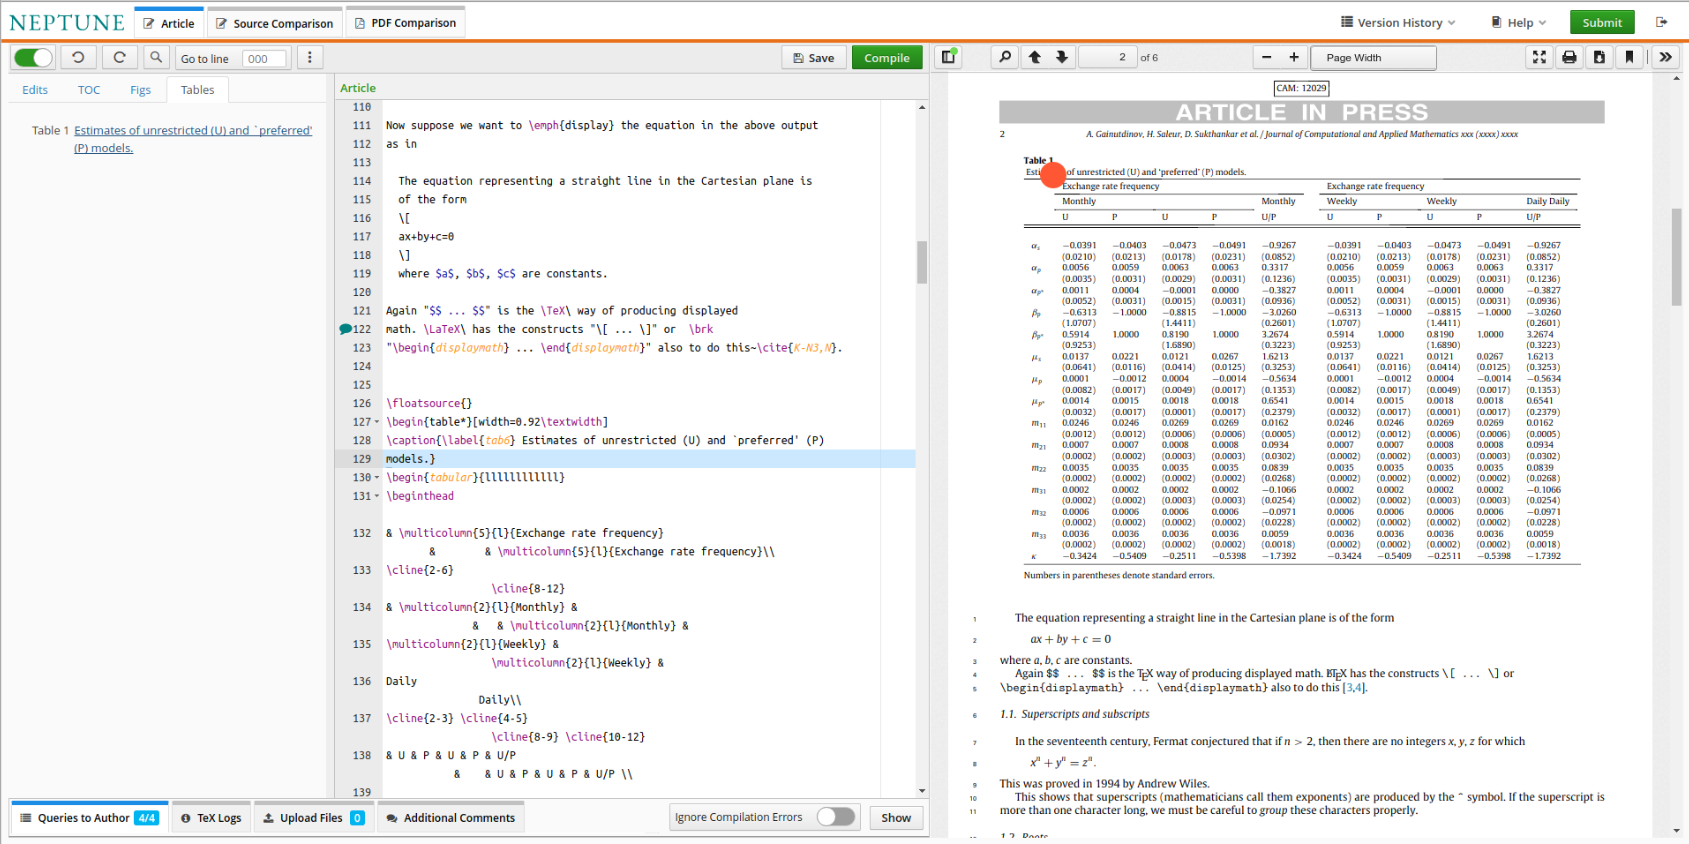
NEPTUNE supports navigation between LATEX sources and PDF output. Click at any point in the source document to be taken to its corresponding location in the PDF. See the screen shot below.
Screenshot of cursor location in PDF
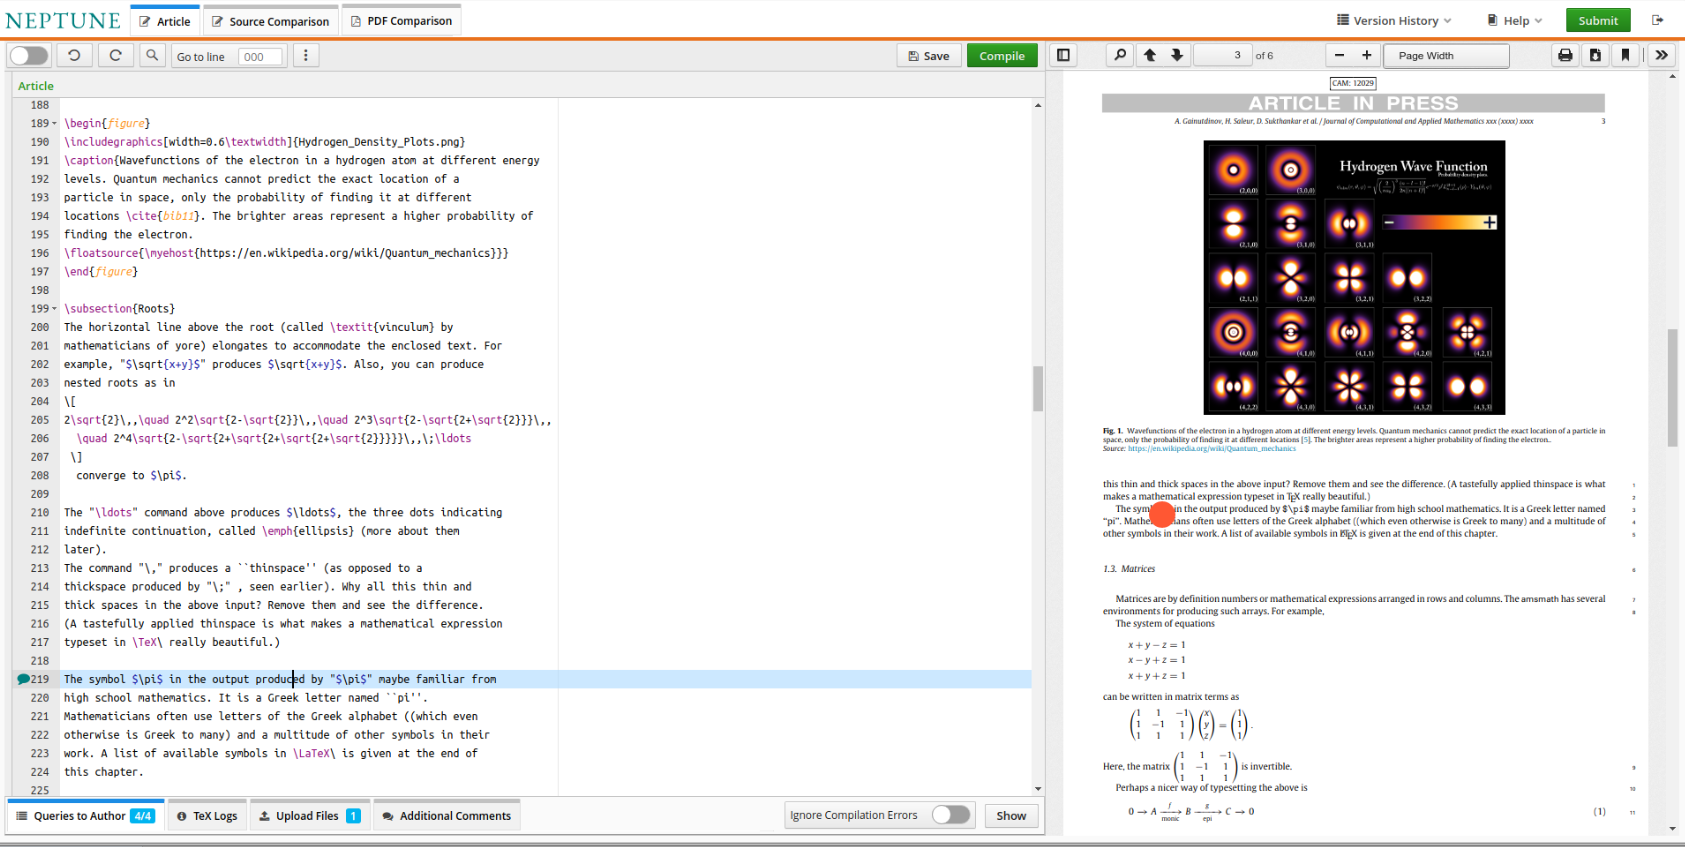
In the PDF window, you can see a red bullet blinking which corresponds to the cursor location in the source document. The red circle will remain in the PDF window for five seconds and will disappear.
For navigating from PDF to source, click on the desired line in the PDF for the corresponding line in the text editor window to be highlighted.
How to use tracker?
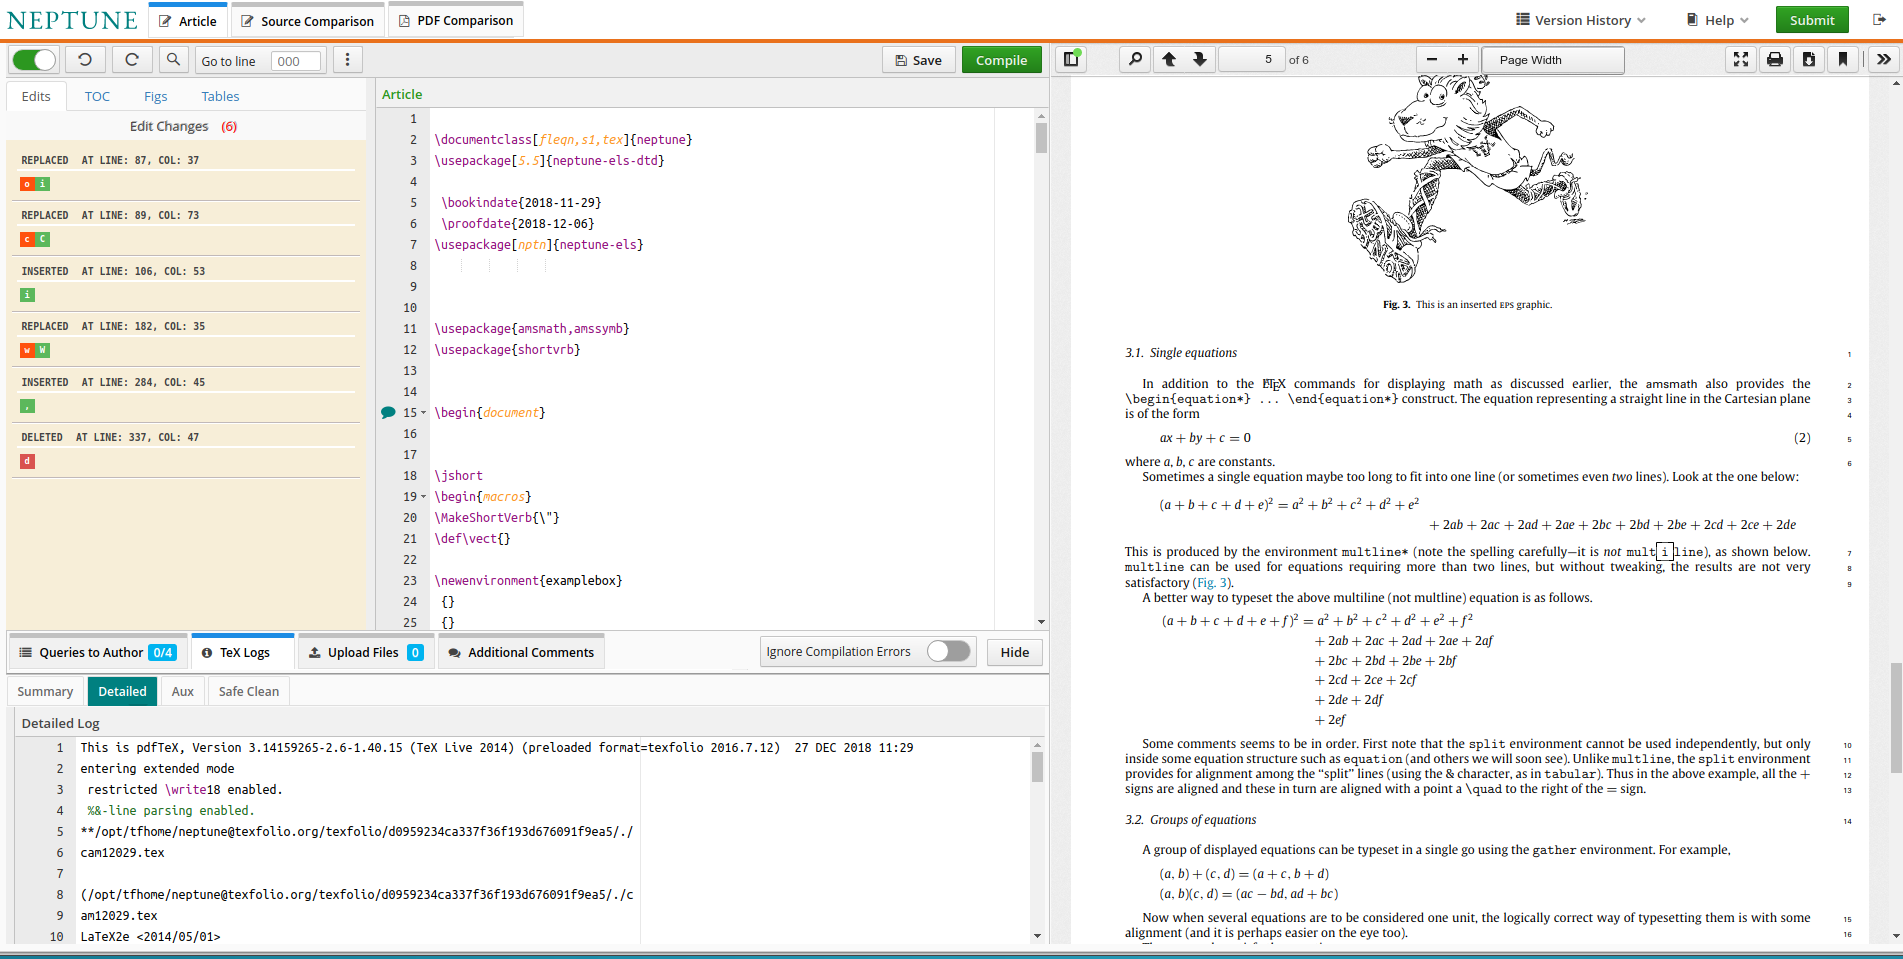
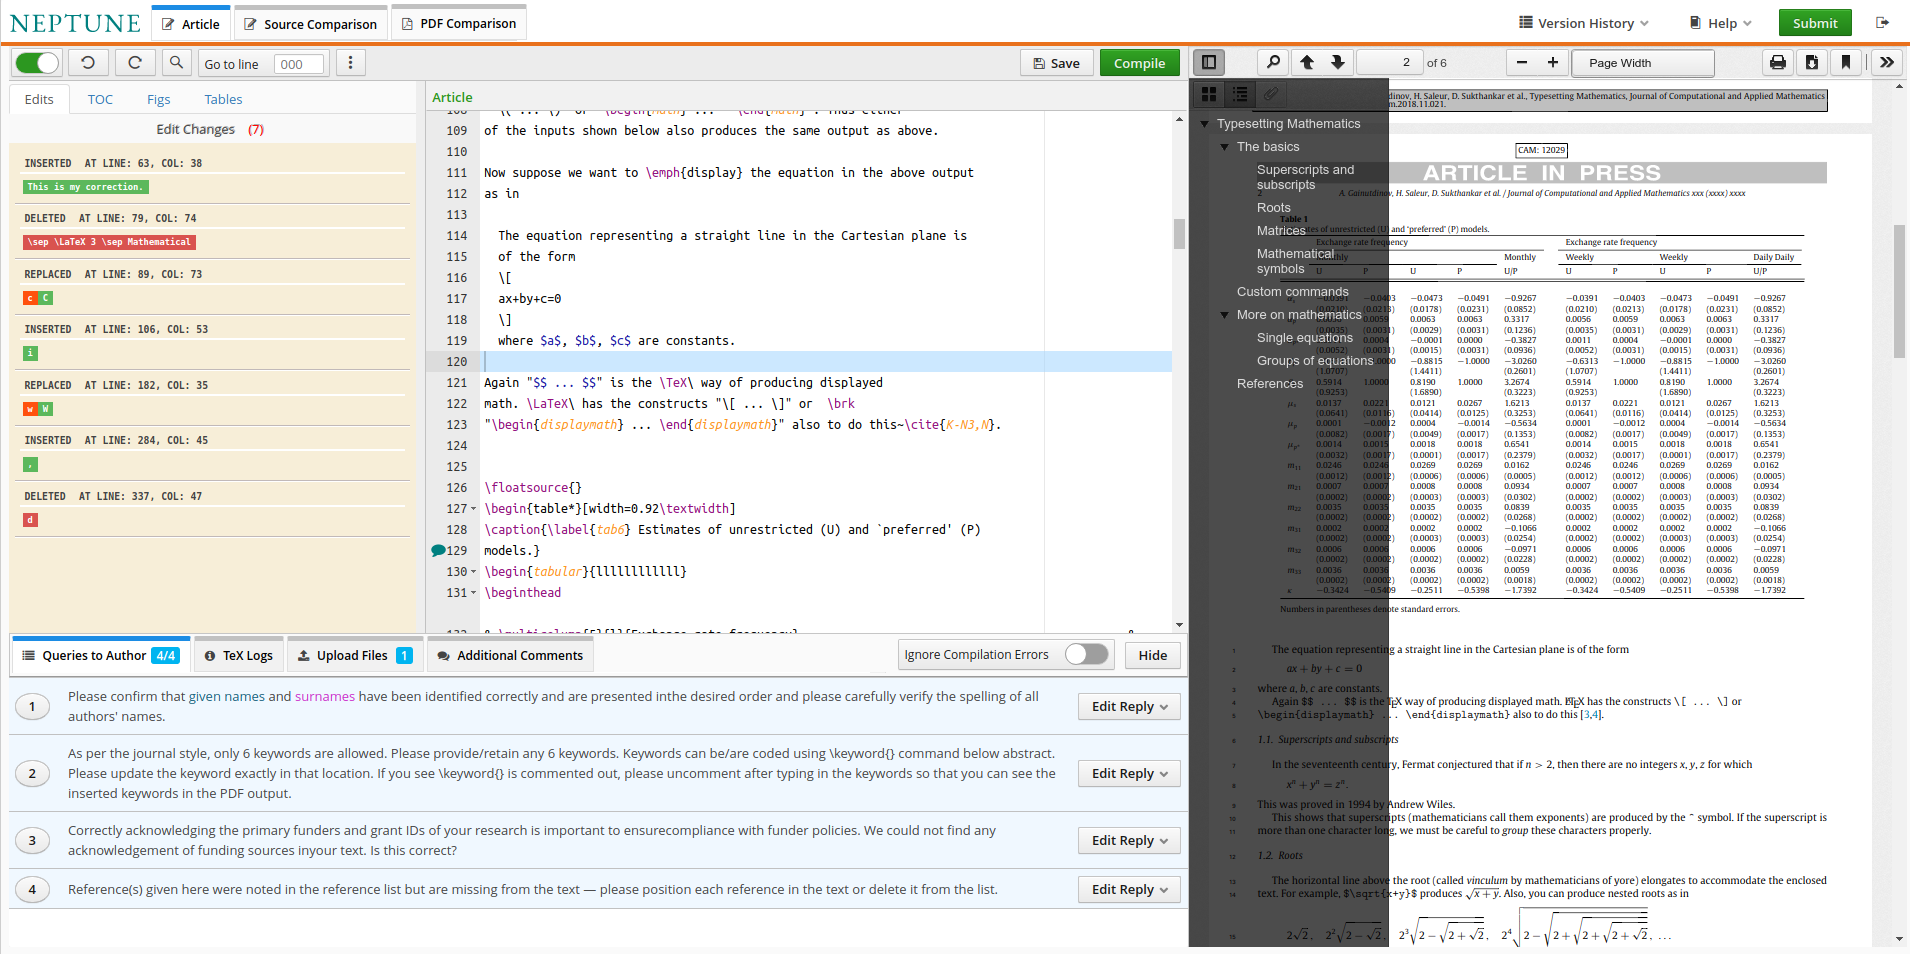
The tracker window is displayed by default. It lists all the edit changes originally made by the copy-editor. Additionally, whenever author edits the document, those changes will also find their place in the tracker.
The inserted text will be in green color and highlighted in the body text in the same color. The deleted text will be highlighted in red color.
The line/column number of insertion/deletion are also provided. When you click any of the text in the tracker window, a pop-up with the corresponding item will appear with Reject the change and Accept options. You can click a button according to your choice. If you don’t do anything, Accept will be applied.
If you have clicked the Reject… button, you can Undo or Redo (as the case may be).
Tracker window can be de-activated by switching off [Tracking Changes] button.
This screenshot shows the tracker window at left, source file in the middle and PDF output in the right.
Author notes, requests, comments, etc.
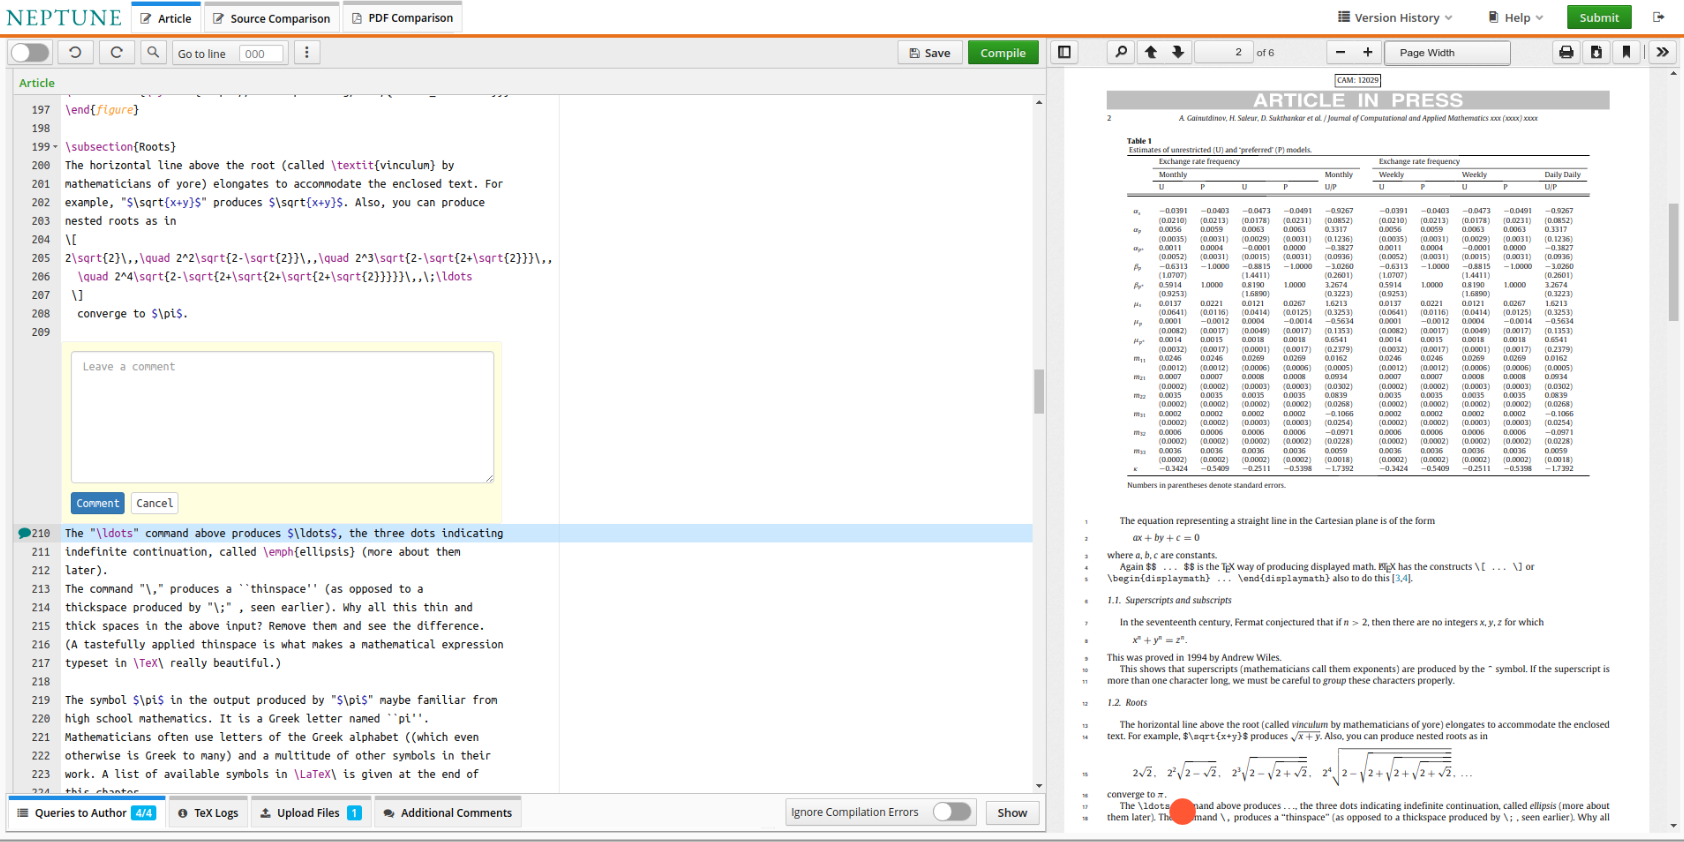
NEPTUNE provides the facility to add a note, instruction, request, comment or
anything of that sort to any location in the document. The user can insert a note or a
similar object simply by clicking the line number in the left margin of the document
source. A small text-area window will pop up, where the user can enter text. Click
the [Comment] button once done.
Here is the screenshot of notes in action:
Log
Clicking Log button in the bottom menu, the user can launch log window which provides a variety of logs generated during TEX’s compilation process. The log window has five buttons that are explained below:
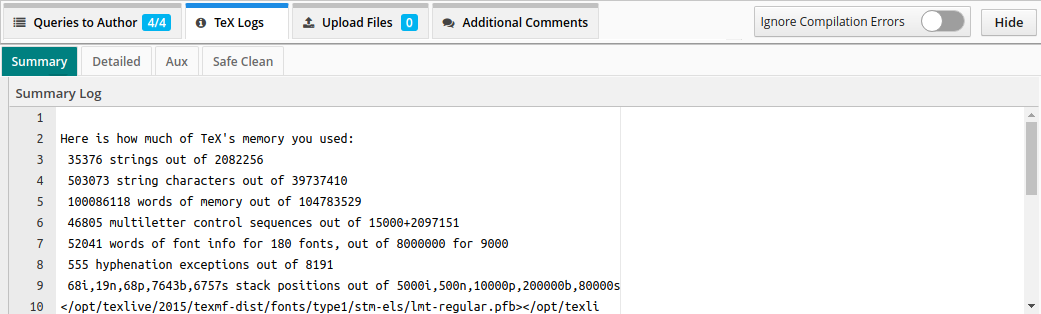
- Ignore Compilation Errors: Switch this button on to ignore compilation errors so that TEX will enter non-stop compilation mode.
- Summary: A quick summary in an easy format. This is the default.
- Detailed: A full and detailed log of a LATEX run for exhaustive debugging.
- Aux: Click this to view the
.auxcreated during compilation. This.auxfile has ref/citation info. - Safe Clean: Click this to remove all temporary files generated in previous run of TEX.
- Hide: Click to hide the expanded log window to its original state.
Screenshot of Log window expanded
Query
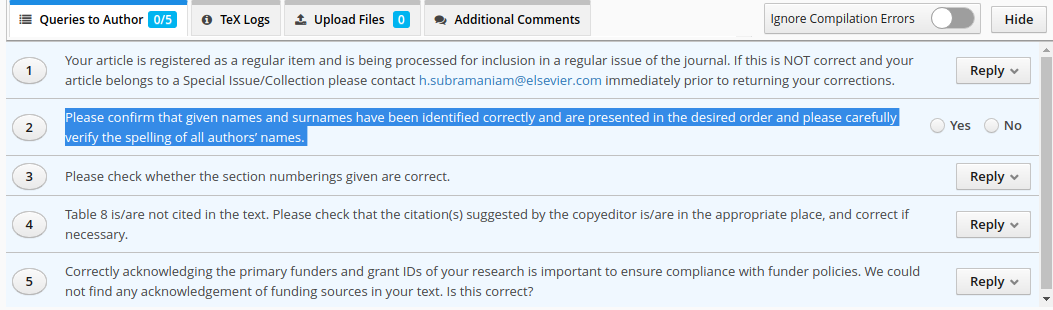
Queries to Author window provides a list of queries directed towards the author that needs to be resolved before finishing the editing job. The number of queries that the author has responded to against the total number of queries is displayed alongside the [Queries to Author] tab. Clicking on the query will take you to the corresponding location in the document source. Additional space is provided in the Reply field where you can enter your comments pertaining to each query.
Some of the queries addressed to the author will be boolean queries where the author has to provide his response from Yes or No options. Below is a screenshot of a highlighted boolean query.
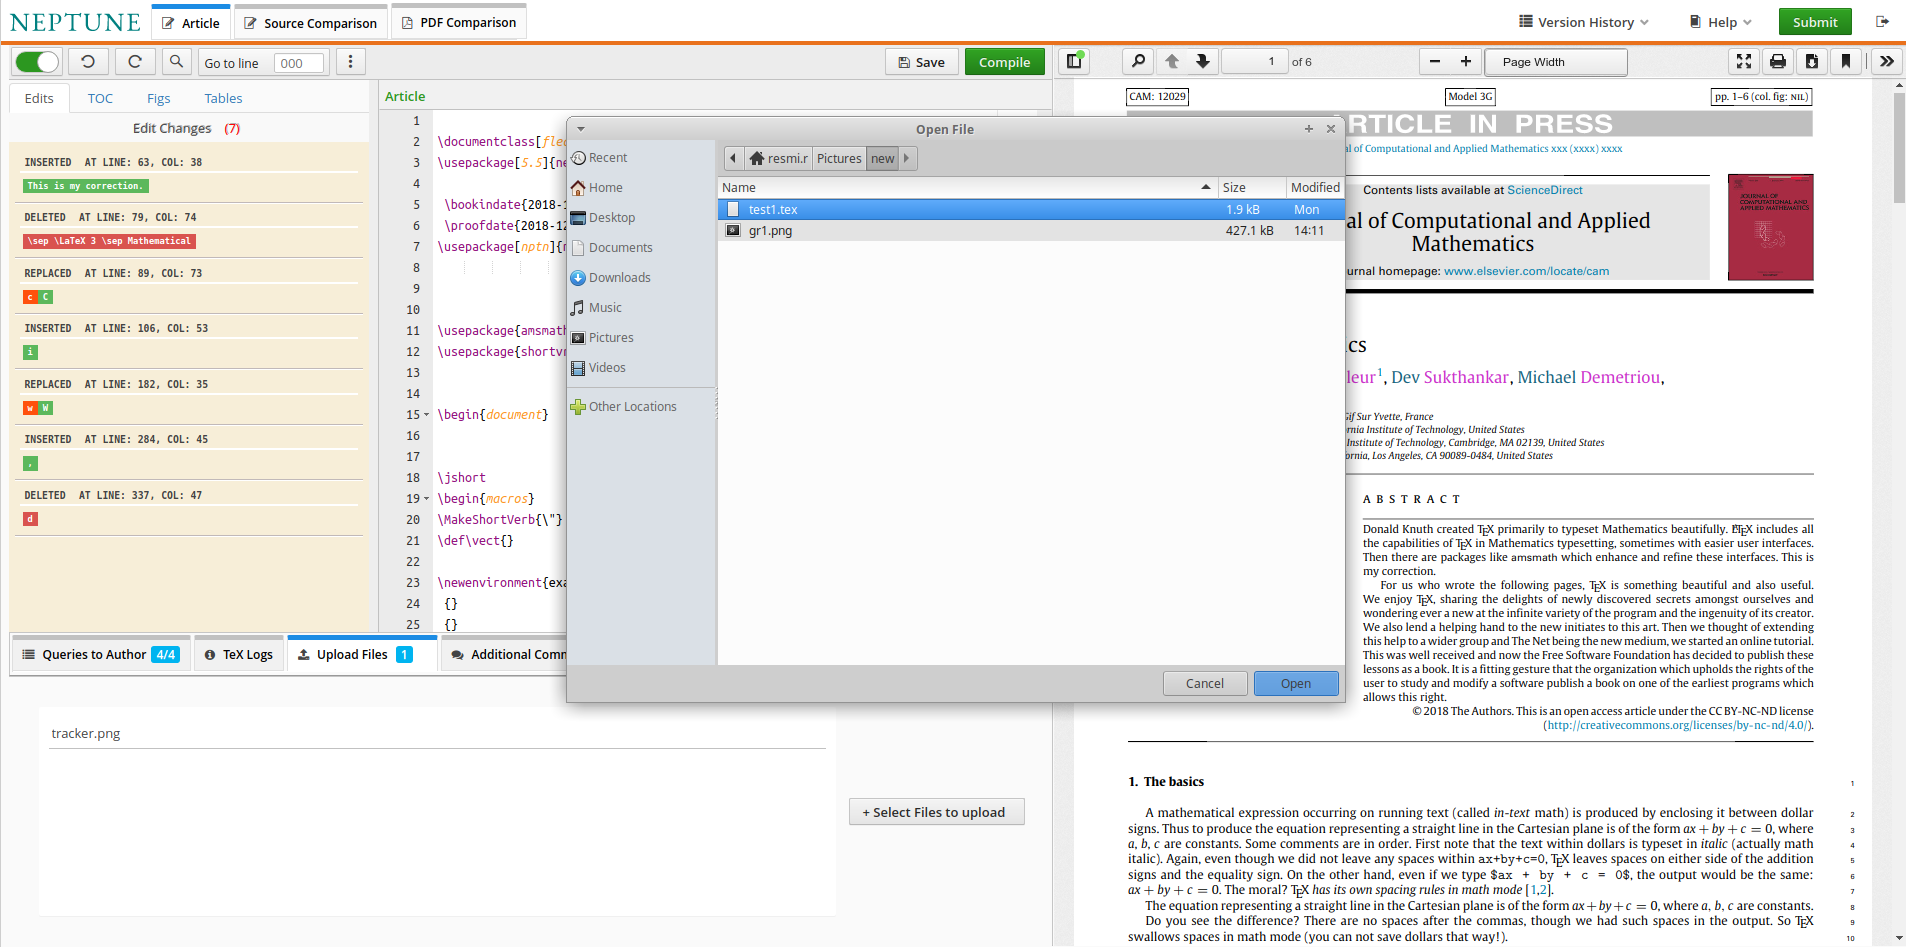
File upload
By selecting the [Upload Files] tab from the bottom panel and clicking on the [Select Files to Upload] button, the user can upload input TEX files, graphic materials, zip files etc. to NEPTUNE.
With appropriate edits or changes in the author source, these files can be accessed immediately and the results introduced in the output for instant verification. In case a biography photo is uploaded, it will be automatically resized to the appropriate specifications.
Pre/post-edited sources
By clicking on the tab Source Comparison in the main menu bar, author can load both the pre- and post-edited versions of source LATEX document. Along with this, a tracker window listing the author-made changes separately will be made visible on the left. The list of changes in the tracker window are hyperlinked to the changed text string in the source document. The author can make a final verification of all the changes and if needed revert them before submitting the document, beyond which, the author can’t make any further changes.
Scroll lock is enabled by default whereby navigation through the source windows are synchronized. It can be disabled as and when required.
Screenshot of Pre/Post-edited Sources
Pre/post-edited output
By clicking on the tab PDF Comparison in the main menu bar, the author can load both the PDFs from pre- and post-edited LATEX sources in the left and right side of the NEPTUNE window. Authors can check if their changes have correctly been reflected in the final versions.
Screenshot of Pre-/post-edited PDFs
How to Edit
General editing
There is nothing special to say about general editing of text. The usual text
attributes like bold (\textbf{...}), italics (\emph{...} or \textit{...}) and
small-caps (\textsc{...}); font attributes like sans serif (\textsf{...}), fixed
width font (\texttt{...}); size changing commands like \large, \small,
\footnotesize, and the like will work as one would expect. A blank line will insert a
para token.
In short, all standard commands in general text manipulations work fine without any surprises.
Frontmatter
If the given name and surname has one name each, then, you can straight away enter
the names as given below. Firstname will be treated as Firstname and Surname will
be treated as Surname.
  \author[1]{Firstname Surname}
  \author[1]{John Hopper} %% Surname is ‘Hopper’
However if Surname has two or more names in it, you have to group the
Surname as given in the below example:
  \author[1]{Firstname {Surname1 Surname2}}
  \author[1]{John {Riley Hopper}} %% Surname is ‘Riley Hopper’
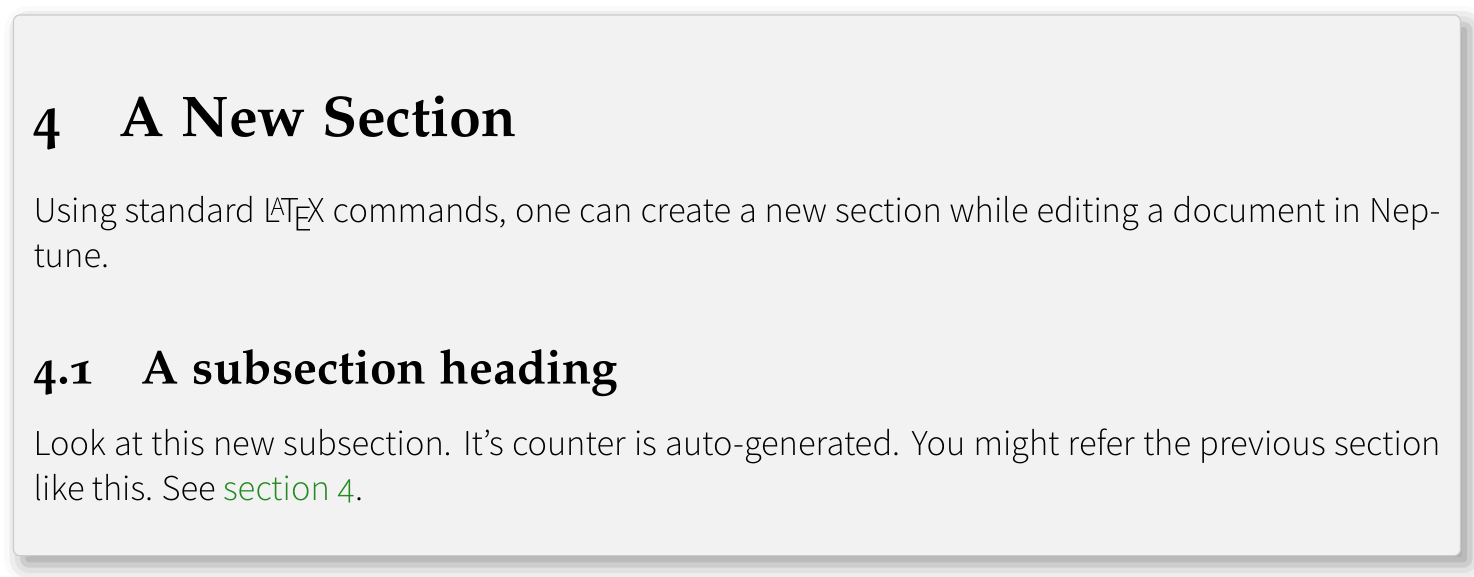
Edit heading levels
For inserting a new section or any other sectional heading, standard LATEX commands can be used. An example of the code is provided in the below verbatim:
\section{A New Section}
 \xlabel{sec30}
 Using standard \LaTeX{} commands, one can create a
 new section while editing a document in Neptune.
\subsection{A subsection heading}
 \xlabel{sec30a}
 Look at this new subsection. It’s counter is auto-generated.
 You might refer the previous section like this. See \xref{sec30}.
By clicking on the tab PDF Comparison in the main menu bar, the author can load both the PDFs from pre- and post-edited LATEX sources in the left and right sides of NEPTUNE window. Authors can check if their changes have correctly been reflected in the final versions.
Slightly modified \xlabel{...} is used in place of \label{...} with the
same functionality. In the same vein, \xref{...} takes the role of
\ref{...}. The cross-ref command, \xref{...} accepts more than one
label as its argument and the output will be sorted and compressed if
needed.
As you’re aware, two TEX runs are needed to fix cross-references to newly inserted objects correctly. You might see the output below:
Screenshot of inserted headings.
Lists
enumitem package is loaded by default, hence all options of enumitem
work fine with NEPTUNE.
 \begin{enumerate}[<options>]
   \item ...
   \item ...
   \item ...
 \end{enumerate}
is an example of how an enumerated list will look like. Similarly,
itemize and description lists can be used.
The most useful option in an enumerate list is to change the list label
to suit one’s requirement. Following enumerated list label options are
supported:
label={<label choice>}⟹ Add custom label. The possible labels are:\arabic*⟹ provides arabic number.\alph*⟹ provides lower alpha label.\Alph*⟹ provides upper alpha label.\roman*⟹ provides lower Roman numeral.\Roman*⟹ provides upper Roman numeral.
l={<label>}⟹ is a shortcut for the above options with possible label values:1or1.or1)or(1)⟹ arabic numeral.aora.ora)or(a)⟹ lower alpha labels.AorA.orA)or(A)⟹ upper alpha labels.iori.ori)or(i)⟹ lower Roman numeral.IorI.orI)or(I)⟹ upper Roman numeral.
Example
\begin{enumerate}[label={(\alph*)}]  or [l={(a)}]
  \item Case of a complex root ...
  \para Next para ....
  \item Convergence but not complex root ...
\end{enumerate}
Output
(a) Case of a complex root ...
    Next para ....
(b) Convergence but not complex root ...
Theorems and similar environments
All the theorem creating commands in LATEX will work correctly and can be used in NEPTUNE.
However, there are three more commands to create theorem like environments:
\newdefinition: creates a theorem like environment; the key difference is that the statement font is upright, unlike italic in the standard theorem. All the options in the theorem will work here too.\newproof: creates a Proof environment with no counters and with upright font.\newitproof: is similar to\newproof, the only difference being the font is in italic shape.
Math
All the standard math commands in LATEX will work fine and can be used
in NEPTUNE. Inline math commands ($ and \(/\)) have the very same
functionality without any differences.
The displayed equation environments of $$, \[/\], {equation},
{eqnarray}, {align}, {gather}, {aligned}, {gathered}, {alignat},
{multline}, and all their starred variants have the very same
functionality. Various kinds of fractions, square roots, matrices and
commutative diagrams of amsmath can also be used without any fear of
misfiring.
The functionality associated with complex math commands derived
from xypic, tikz, and the like will also work fine, provided the
packages are loaded in the preamble of the document if not done
previously.
However, a small change that has been introduced to augment XML
generation from newly inserted author code is the change of \label{...}
to \xlabel{...}. A few examples are given hereunder:
For single line displayed equation, the syntax is:
    \begin{equation}\xlabel{eqn1a}
     (a+b)^2 = a^2 + 2ab + b^2
    \end{equation}
On the contrary, if the displayed equation is multi-lined, the syntax takes the following forms:
  \begin{align}
     (a+b)^2 & = a^2 + 2ab + b^2\\
     (a-b)^2 & = a^2 - 2ab + b^2
   \end{align}
Or
  \begin{align}
     \nf& (a+b)^2  = a^2 + 2ab + b^2\\
     \nf& (a-b)^2  = a^2 - 2ab + b^2
   \end{align}
Note: Please do not remove the \nf command unnecessarily.
If an equation with a custom equation number like $x_1^2$ is to be
inserted, here is the way:
    \begin{equation}\tag{$x_1^2$}
     (a+b)^2 = a^2 + 2ab + b^2
    \end{equation}
Figures, display figures and inline figures
The default figure inclusion command in LATEX, \includegraphics shall
be used for inclusion of graphic material. All options like width,
height, rotation to arbitrary angles, trim, clip, scale (down or up),
and all other options will work as one would expect. New figures can be
uploaded using the upload tab. For more information check the File
Upload section of the user guide.
The default {figure} environment in LATEX with all options will work
correctly and can be used in NEPTUNE. E.g.,
  \begin{figure}[<options>]
   \caption{ ... }
   \xlabel{<label>}
   \includegraphics[<options>]{<figure file name>}
  \end{figure}
Various options to \includegraphics can be added as
\includegraphics[width=\textwidth,scale=0.5,angle=90]{gr1}
The starred variant ({figure*}) shall be used when large-sized graphic
materials have to be included in a two-column page layout.
Sub-figures shall be tagged with the command \subfloat. A typical
example with usage explanation is provided below:
  \begin{figure}[t]%4
  \caption{Result of the measurement of channels 1--8.\xlabel{fig:DNL}}
    \subfloat[Channel 1.]{\includegraphics{gr4a}\xlabel{fig:DNLa}}
    \subfloat[Channel 2.]{\includegraphics{gr4b}\xlabel{fig:DNLb}}
   \break
    \subfloat[Channel 3.]{\includegraphics{gr4c}\xlabel{fig:DNLc}}
    \subfloat[Channel 4.]{\includegraphics{gr4d}\xlabel{fig:DNLd}}
   \break
    \subfloat[Channel 5.]{\includegraphics{gr4e}\xlabel{fig:DNLe}}
    \subfloat[Channel 6.]{\includegraphics{gr4f}\xlabel{fig:DNLf}}
   \break
    \subfloat[Channel 7.]{\includegraphics{gr4g}\xlabel{fig:DNLg}}
    \subfloat[Channel 8.]{\includegraphics{gr4h}\xlabel{fig:DNLh}}
  \end{figure}
The syntax of \subfloat command is:
\subfloat[<optional sub caption>]{<fig inclusion command>}
The sub-figures will be arranged horizontally and \break command shall
be used to break the line to arrange remaining figures in another
line.
If new subfloats are to be added then please upload each subfloat
individually and move the \nosubfloat command present in TeX code after
the newly added subfloats.
The {figure} environment shall be used to wrap up all sub-figures.
The starred variant ({figure*}) shall be used in a two-column
page.
Additionally, there are two more types of figures used: (1) display figures and (2) inline figures.
- Display figure: A non-floating figure without caption shall
be provided as:
\begin{dfigure} \includegraphics[<options>]{<figure file name>} \end{dfigure} - Inline figure:
\infigwith file name shall be used to insert inline graphic material.\infig{<figure file name>}
Floating and display tables
The default {table} environment in LATEX with all options will work
correctly and can be used in NEPTUNE. E.g.,
 \begin{table}
  \caption{Relation between the calculated and measured bin sizes
           \xlabel{tab:DNL_bin_110MHz}}
  \begin{tabular*}
    {\columnwidth}
    {@{\hspace*{6pt}}@{\extracolsep{\fill}}*{4}{l}@{\hspace*{6pt}}}
    \beginthead
    Phase $j$ & Input signal & Calculated & Measured\\
    \endthead
    % \hline
    0 & 4.62 & 0.20 & 0.21 \\
    1 & 4.70 & 0.20 & 0.20 \\
    2 & 4.79 & 0.34 & 0.36 \\
    3 & 4.73 & 0.39 & 0.37 \\
    \bottomrule
  \end{tabular*}
 \end{table}
The starred variant ({table*}) shall be used when large-sized tables
have to be included in a two-column page layout.
The {tabular*} needs to be used always as we need to control the width
of the tabular, often we have to span the tabular to the width of the
column depending on the number and size of columns.
The commands \beginthead and \endthead are extra structuring additions
to augment XML generation. Those will further add horizontal rules
above and below tabular heading row(s).
\bottomrule has to be added before the tabular ending command
\end{tabular*}, to insert a rule at the bottom of the tabular.
Display table: A non-floating table without caption shall be provided as:
 \begin{informaltable}
  \begin{tabular}{<column specs>}
    ... ... ... \\
    ... ... ... \\
    ... ... ... \\
    ... ... ...
  \end{tabular}
 \end{informaltable}
Bibliography
The bibliographic items have to be heavily structured to generate the right kind of XML from the LATEX documents. As a standard, popular, user friendly and optimal tagging scheme that meets the technical requirements of both typesetting and XML generation with least effort on the part of the authors, we have adopted BibTEX format for bibliography which TEX authors are familiar with its usage and functionality. BibTEX helps to re-order the listing as per the order of citations in the body of the document in numbered citation style and sorting of bib items in author-year scheme painlessly even after several bib items have been added or removed during author proofing.
However, to save the drudgery of keying the BibTEX record when an author
needs to insert a \bibitem afresh, a simpler type, namely, @others is
adopted in which authors need to insert the whole bibliographic item
text as an argument of the field, commn. Here is a typical example of
new coding:
   @others{bibkey,
    commn={Welch, Ivo. (2010) A comprehensive look at the empirical
     performance of equity premium prediction. Rev. Financ. Stud.
     123 (1), 121-133.}
   }
A few BibTEX record examples are given below.
Journal
@ARTICLE{submonorev,
 serialno={43},
 author={Oliveira, T.J. and Aarao Reis, F.D.A.},
 title={Scaling in reversible submonolayer deposition},
 journal={Phys. Rev. B},
 volume={87},
 year={2013},
 artnum={235430},
 doi={10.1103/PhysRevB.87.235430},
}
Book
@BOOK{zhao,
 serialno={26},
 author={Zhao, Y. and Wang, G.-C. and Lu, T.-M.},
 year={2001},
 booktitle={Characterization of Amorphous and Crystalline
            Rough Surface: Principles and Applications},
 publisher={Academic Press},
 city={San Diego, CA, USA},
}
Inbook
@INBOOK{Huang,
 serialno={3},
 author={Huang, D. and Li, Shuliang},
 pages={42-52},
 year={2018},
 title={A Survey of the Current Status of Research
        on Quantum Games},
 booktitle={Proc. of the 2018 4th Int. Conference on
            Information Management, ICIM2018},
 orgname={IEEE, The University of Oxford},
 city={UK},
}
Others/Miscellaneous
@OTHERS{Khan2018,
 serialno={6},
 commn={Khan, F.S. and Solmeyer, N. and Balu, R. and Humble, T.,
         Quantum games: a review of the history, current state,
         and interpretation, 2018. ArXiv preprint
         \myehost{arXiv:1803.07919}},
}
Biography
Following is the default biography coding. In this case the biography photos will be named as pic1.pdf, pic2.pdf etc.
 \begin{biography}
%  \includepic
  \textbf{<author name>} <biography text>
 \end{biography}
An example is given here:
 \begin{biography}
%  \includepic
  \textbf{John Hopper} This is the biography text. This is the
    biography text. This is the biography text. This is the
    biography text.
 \end{biography}
You may even upload a new photograph for a newly provided biography or as a replacement to the existing one. In that case, you have to mention the filename of the photograph as given below. .pdf, .png and .jpg are accepted.
 \begin{biography}
  \includepic[john_hopper.jpg]
  \textbf{John Hopper} This is the biography text. This is the
    biography text. This is the biography text. This is the
    biography text.
 \end{biography}
Conflict of interest
If the proof is missing conflict of interest section and you were requested to provide one, then please provide the same after the last section but before or after acknowledgement. An example is given below:
\conflictofinterest
No author associated with this paper has disclosed any potential or
pertinent conflicts which may be perceived to have impending conflict
with this work.
Labels and Cross-references
Slightly modified \xlabel{...} is used in place of \label{...} with the
same functionality. In the same vein, \xref{...} takes the role of
\ref{...}. The cross-ref command, \xref{...} accepts more than one
label as its argument and the output will be sorted and compressed if
needed.
As you’re aware, two TEX runs are needed to fix cross-references to newly inserted objects correctly.
Cross-ref commands
\xref{clm1}⟹ Claim 3.2 [Default string + counter]\xref{clm1,clm2}⟹ Claims 3.2 and 3.3 [Default string + counters]\xref{clm3,clm2,clm4}⟹ Claims 3.2---3.4 [Default string + counters, sorted and compressed]\nxref{clm1}⟹ 3.2 [Only counter]\xref[env=Postulate]{clm1}⟹ Postulate 3.2 [Custom string + counter]
\xref command:
\xref[nosort]{label1,label2}
\norefsort⟹ Do not sort the ref values in the document.\refsort⟹ Sort the ref values in the document (default).
Cross-ref Options
id=<id>⟹ Add custom id (applicable only during XML generation).num=<number>⟹ Add custom number instead of default counter.env=<env string>⟹ Add custom environment string.nolink⟹ Remove link.noenv⟹ Remove string.noctr⟹ Remove counter.sort⟹ Sort the values in current xref command alone (in a non-sorted surrounding).nosort⟹ Do not sort the values in current xref command alone (in a sorted surrounding).sfx⟹ Add suffix to the counter.pfx⟹ Add prefix to the counter.linkstr={<link string>}⟹ Change default string in a multi-label\xref{...}command. Default isand, at times, users might need to change it tothroughand the like.range⟹ Provides range of references if labels for begin and end refs are provided, separated by comma.
Examples for ranged xref
\xref[range]{fig1,fig4}⟹ Figs. 1---4\xref[range]{eqn1,eqn5}⟹ Eqs. (1)---(5)\nxref[range]{eqn1,eqn5}⟹ (1)---(5) [without the string Eqs.]\xref[range,linkstr={ through }]{fig1,fig8}⟹ Figs. 1 through 8\nxref[linkstr={ through }]{eqn1,eqn2,eqn3,eqn4}⟹ (1) through (4) [norangeoption used, hence need to provide all labels.]\nxref[range,linkstr={ through }]{eqn1,eqn4}⟹ (1) through (4) [rangeoption used, hence need to provide only begin and end labels alone,linkstrchanged.]
Citations
- The bibliographic model as specified by the journal will be chosen by NEPTUNE automatically and authors need not be bothered about it.
- Irrespective of authors’ coding of bibliographic items (i.e., author-year or numbered schemes), NEPTUNE will take care of citations depending on the journal style.
- NEPTUNE loads
natbib.styby default. - All the commands provided by
natbibwill work fine.
Line number
Line numbers are disabled in the PDF. However if authors want
to enable line numbers, add the command \stmlinenumbers after
\begin{document}.
Supported Browsers
NEPTUNE supports the following browsers with version numbers noted against their names or later:
- Firefox: 54+
- Google: Chrome 55+
- Safari: 11.02+
- Internet Explorer: 11+
- Microsoft Edge 41.16+
- Opera 53
A Gallery of Screenshots
A few screenshots have been linked here that explains the efficiency of NEPTUNE. Click the images to zoom in to full sized ones.
![]()

Frequenty Asked Questions (FAQ)
- I have made changes in the bibliography section but the
corrections are not reflected in the PDF. What should be
done?
The bibliography section is generated from a BiBTeX database. For the changes to be reflected in the PDF, a minimum of two compilations are required. - All the sub-figures I have added have been merged into a single
figure and I cannot make any edits in them.
During production stage we have merged the subfigures into a single figure for easier handling. If you want to update the figure, please upload a composite figure of all the subfigures including the replaced subfigure. However, if you still want to upload them as subfigures, then you may need to upload the rest of the figure parts as well. Filenames should be same as that we have mentioned in the \includegraphics{} commands. If you are uploading subfigures, please do not forget to move the \nosubfloat command which is given right at the top of the environment to a position that comes after your edits in the subfigures. - I have used TikZ/pgfplots to generate the figures but in the proof
the code is replaced with an image of the output.
The articles are processed through a XML-based workflow. Therefore as per Elsevier DTD, figures should be present as images. For updating the figures please upload the modified figure output generated from the TikZ code or provide the updated TeX code. The image/code can be uploaded to ‘‘Upload files’’ tab. You may also include the code as a comment in the ‘‘Additional Comment’’ tab. The production team will use the TeX code to generate the image and the figure will be updated in the next stage of production. - The figures and tables have been placed all around the article
ignoring the location of their citations. Why is it done
so?
The articles are prepared as per Elsevier Leman journal standards, according to its procedure need to keep only the sequential order of figures and tables. If you feel that the current layout is unsatisfactory then please add a comment in the additional comments tab mentioning your requirement. Our production team will try there best to incorporate the changes in the next stage of production. - How do I request for a revised proof through Neptune?
     Please add a comment in the additional comments tab mentioning your requirement.
     Our production team will send a revised PDF copy before the final publication.